 Pin It
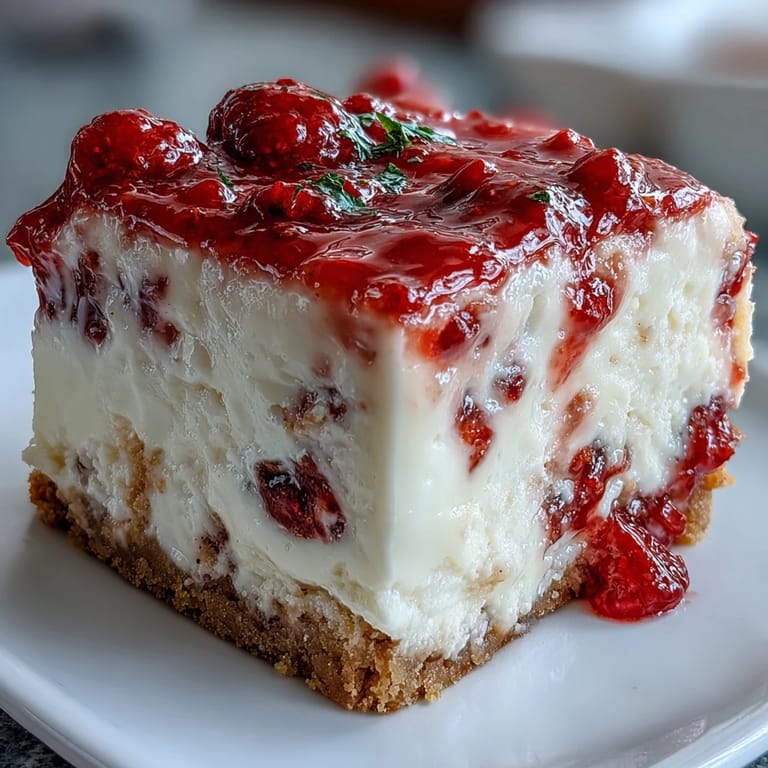
 My kitchen smelled like a bakery collided with a berry patch the afternoon I pulled this cheesecake from the oven. I'd been intimidated by cheesecakes for years, convinced they were only for pastry chefs with steady hands and infinite patience. But a friend's birthday was coming up, and she'd mentioned, just once, how much she loved the combination of white chocolate and raspberry. I took the leap, and the swirls turned out better than I'd imagined. That wobbly center as it cooled made my heart race, but by the next morning, it had set into something I was genuinely proud of.
I brought this to a summer potluck once, still chilled in its pan, wrapped in a towel. When I released the springform ring at the table, there was this collective gasp, like I'd performed a magic trick. Someone asked if I'd ordered it from a fancy bakery. I didn't correct them right away. Later, after everyone had seconds, I admitted I'd made it in my tiny apartment kitchen, and suddenly three people wanted the recipe. It became my signature dessert without me ever planning for it to be.
Ingredients
- Graham cracker crumbs: The buttery, slightly sweet base that holds everything together; press it down firmly or it will crumble when you slice.
- Granulated sugar: Used in the crust, raspberry sauce, and batter to balance tartness and sweetness; don't skimp in the filling or it will taste flat.
- Melted butter: Binds the crust and adds richness; make sure it's fully melted so it coats every crumb evenly.
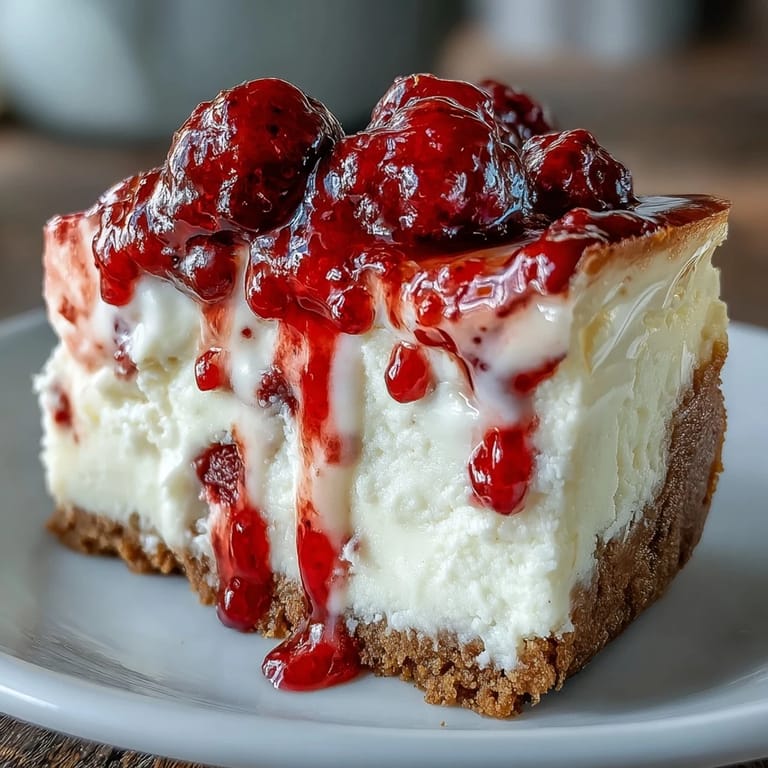
- Fresh or frozen raspberries: The tart, vibrant counterpoint to the white chocolate; frozen work just as well and are often more affordable.
- Lemon juice: Brightens the raspberry sauce and keeps it from tasting one dimensional; just a teaspoon makes a difference.
- White chocolate: Choose a good quality brand with cocoa butter listed first; cheap chocolate can seize or taste waxy.
- Cream cheese: The heart of the cheesecake; it must be fully softened or you'll have lumps no amount of mixing will fix.
- Eggs: Add structure and creaminess; beat them in gently to avoid incorporating too much air.
- Vanilla extract: A subtle warmth that ties the flavors together without overpowering the white chocolate.
- Sour cream: Adds tang and keeps the texture silky; don't substitute with yogurt or the consistency will suffer.
- Heavy cream: Thins the batter just enough to make it pourable and smooth.
Tired of Takeout? 🥡
Get 10 meals you can make faster than delivery arrives. Seriously.
One email. No spam. Unsubscribe anytime.
Instructions
- Prep the pan and preheat:
- Grease your springform pan well and line the bottom with parchment so the crust releases cleanly. Preheat the oven to 325°F while you work on the crust.
- Make the crust:
- Mix graham cracker crumbs, sugar, and melted butter until it looks like wet sand, then press it firmly into the pan bottom. Bake for 8 minutes to set it, then let it cool completely before adding the filling.
- Cook the raspberry sauce:
- Simmer raspberries, sugar, and lemon juice in a small pan over medium heat, stirring often, until it thickens like jam. Strain out the seeds if you want it smooth, then let it cool while you prepare the batter.
- Melt the white chocolate:
- Use a double boiler or microwave in short bursts, stirring between each, until it's glossy and smooth. Let it cool slightly so it doesn't scramble the eggs when you add it to the batter.
- Beat the cheesecake batter:
- Cream the softened cream cheese and sugar until fluffy, then add eggs one at a time, mixing just until combined. Fold in vanilla, sour cream, heavy cream, and the melted white chocolate until the batter is silky and uniform.
- Layer and swirl:
- Pour half the batter over the cooled crust, dollop half the raspberry sauce on top, and swirl gently with a knife. Repeat with the remaining batter and sauce, creating those beautiful marbled ribbons.
- Prepare the water bath:
- Wrap the outside of the springform pan tightly in two layers of foil to keep water out. Set it in a roasting pan and pour hot water around it until it reaches halfway up the sides of the springform.
- Bake low and slow:
- Bake for 60 to 70 minutes, until the edges are set but the center still jiggles slightly when you gently shake the pan. The residual heat will finish cooking it as it cools.
- Cool gradually:
- Turn off the oven, crack the door open, and let the cheesecake cool inside for an hour to prevent cracking. Then remove it from the water bath and refrigerate for at least 4 hours, or overnight for the best texture.
- Serve with flair:
- Run a thin knife around the edge before releasing the springform ring. Top with extra raspberry sauce or fresh berries, slice with a hot, clean knife, and watch people's faces light up.
 Pin It
 The first time I served this at a holiday dinner, my aunt, who rarely compliments desserts, went back for a second slice without saying a word. Later, as we were cleaning up, she pulled me aside and asked if I'd teach her how to make it. We spent the next afternoon in her kitchen, laughing as raspberry sauce splattered on her apron, and she's been making it for her book club ever since. It's become more than a recipe; it's a little tradition we share, a reason to spend time together that doesn't require a special occasion.
Getting the Perfect Swirl
The swirl is where this cheesecake goes from pretty to breathtaking, and it's easier than it looks. Don't overthink it; just dollop the raspberry sauce in a few spots across the batter, then drag a butter knife or skewer through it in a figure eight or zigzag pattern. The key is to swirl gently and not too many times, or the colors will muddy together. I learned this the hard way after my first attempt turned into a pink mess. Now I do just two or three passes per layer, and it looks like art every time.
Why the Water Bath Matters
I used to think water baths were fussy and unnecessary until I baked a cheesecake without one and it came out dry with a giant crack down the middle. The steam from the water bath creates a gentle, even heat that keeps the cheesecake creamy and prevents the top from splitting. Yes, wrapping the pan in foil is an extra step, but it takes two minutes and saves you from a dessert that tastes fine but looks like it survived an earthquake. Trust me, it's worth the small effort.
Make Ahead and Storage Tips
This cheesecake actually improves after a night in the fridge, as the flavors meld and the texture firms up to that perfect creamy density. I always make it the day before I need it, sometimes even two days ahead, and store it covered in the springform pan or transferred to a cake plate and wrapped in plastic. It keeps beautifully for up to five days, though it rarely lasts that long in my house. Freezing works too; wrap individual slices tightly and thaw them in the fridge for a quick indulgence whenever the craving strikes.
- Always store covered to prevent it from absorbing fridge odors.
- If freezing, wrap slices individually in plastic wrap, then foil, for up to two months.
- For clean slices, wipe your knife with a hot damp towel between each cut.
 Pin It
 There's something deeply satisfying about pulling a dessert like this from your own oven, knowing you created something that looks and tastes like it came from a high end patisserie. I hope it brings you as much joy, and as many compliments, as it's brought me.
Recipe Questions & Answers
- → Why use a water bath when baking cheesecake?
A water bath creates gentle, even heat that prevents the cheesecake from cracking. The steam keeps the air moist, allowing the cheesecake to cook slowly and evenly. This results in a silky smooth texture with properly set edges and a slightly wobbly center.
- → Can I make this cheesecake ahead of time?
Absolutely! This cheesecake actually tastes better when made a day in advance. The flavors meld and develop during chilling time. You can make it up to 2 days before serving, but add fresh garnish just before presenting.
- → How do I know when the cheesecake is done baking?
The edges should be set and slightly puffy, while the center should still have a gentle wobble like Jell-O when you gently shake the pan. The residual heat will finish cooking the center as it cools. Avoid overbaking, which can cause cracks.
- → Can I use frozen raspberries for the sauce?
Yes, frozen raspberries work beautifully for the sauce. They may need slightly more sugar since fresh berries tend to be sweeter. Thaw them slightly before cooking, and adjust the cooking time as needed to reach the desired thickened consistency.
- → What's the best way to slice cheesecake cleanly?
Dip your knife in hot water and wipe it clean between each slice. Use a thin, sharp knife and cut with gentle downward pressure rather than sawing motions. For extra clean slices, you can also run the knife under hot water and dry it between cuts.
- → How should I store leftover cheesecake?
Store leftovers in the refrigerator, covered loosely with foil or plastic wrap. The cheesecake will keep well for up to 5 days. For longer storage, wrap individual slices tightly in plastic wrap and freeze for up to 3 months. Thaw in the refrigerator overnight before serving.